Training the Model
Deepwave currently recommends using TensorFlow 2 as the training framework. While we support the legacy TensorFlow 1, the interface for Tensorflow 2 is more user friendly and will be the supported version of TensorFlow going forward.
Start AirPack Docker Container
The AirPack Docker container is started the same way for all training framework. Ensure that all the steps in AirPack Installation have been completed.
Note: the AirPack directory is not contained within the docker image. It must be mounted
when the container is started via the -v option. This also allows for the code and
output of training to be accessible by the host machine. See below for details.
To start the docker container:
docker run -it \
-v <path_to_AirPack>:/AirPack \
-v <path_to_AirPack_data>:/data \
--gpus all \
<docker-image-name>
where:
<path_to_AirPack>- the path to the AirStack folder on the host<path_to_AirPack_data>- the path to the AirStack data set. See here for more information.<docker-image-name>- is the name of the docker image assigned when the image was created during the AirPack Installation.
After executing this command you are in a Linux environment within the Docker container. If you are unfamiliar with Docker, it is very similar to a virtual machine. the
-vflag will mount the AirPack toolbox and data in/AirPackand/data, respectively.Set up your copy of the AirPack Python code for use. This will allow you to edit code from both inside and outside of the container, as well as import the
airpackmodule and use it from your own custom code. Do this each time you start a new container.$ pip install -e /AirPack
TensorFlow

 Click on the above video to make it large and open in new window.
TensorFlow 2
Train the Model
Run the training script from within the Docker container:
$ python /AirPack/airpack_scripts/tf2/run_training.py
The script will periodically display a terminal output similar to the following:
$ python /AirPack/airpack_scripts/tf2/run_training.py
...
Epoch 1/10
610/610 [==============================] - 11s 17ms/step - loss: 0.8916 - categorical_accuracy: 0.6776 - val_loss: 0.4115 - val_categorical_accuracy: 0.8332
Epoch 2/10
610/610 [==============================] - 9s 15ms/step - loss: 0.3341 - categorical_accuracy: 0.8670 - val_loss: 0.2753 - val_categorical_accuracy: 0.8781
Epoch 3/10
610/610 [==============================] - 9s 15ms/step - loss: 0.2468 - categorical_accuracy: 0.9020 - val_loss: 0.2411 - val_categorical_accuracy: 0.8997
Epoch 4/10
610/610 [==============================] - 9s 15ms/step - loss: 0.1669 - categorical_accuracy: 0.9376 - val_loss: 0.1700 - val_categorical_accuracy: 0.9510
Epoch 5/10
610/610 [==============================] - 9s 15ms/step - loss: 0.1401 - categorical_accuracy: 0.9542 - val_loss: 0.2257 - val_categorical_accuracy: 0.9282
Epoch 6/10
610/610 [==============================] - 9s 15ms/step - loss: 0.1013 - categorical_accuracy: 0.9691 - val_loss: 0.1021 - val_categorical_accuracy: 0.9682
Epoch 7/10
610/610 [==============================] - 9s 15ms/step - loss: 0.0772 - categorical_accuracy: 0.9771 - val_loss: 0.1036 - val_categorical_accuracy: 0.9659
Epoch 8/10
610/610 [==============================] - 9s 15ms/step - loss: 0.0691 - categorical_accuracy: 0.9800 - val_loss: 0.0849 - val_categorical_accuracy: 0.9773
Epoch 9/10
610/610 [==============================] - 9s 15ms/step - loss: 0.0446 - categorical_accuracy: 0.9881 - val_loss: 0.1164 - val_categorical_accuracy: 0.9678
Epoch 10/10
610/610 [==============================] - 9s 14ms/step - loss: 0.0616 - categorical_accuracy: 0.9834 - val_loss: 0.1057 - val_categorical_accuracy: 0.9731
Once the script has completed the training iterations, it will produce multiple files in the
/AirPack/outputdirectory including the following:saved_model.onnx - File that will be used for deployment on the AIR-T
Perform Inference with Trained Model
You may use the
run_inference.pyscript to evaluate the performance of the model and plot the result. This script will load thesaved_model.onnxfile produced during training, feed the test data through the network, and create a result plot.Run the inference script
$ python /AirPack/airpack_scripts/tf2/run_inference.py
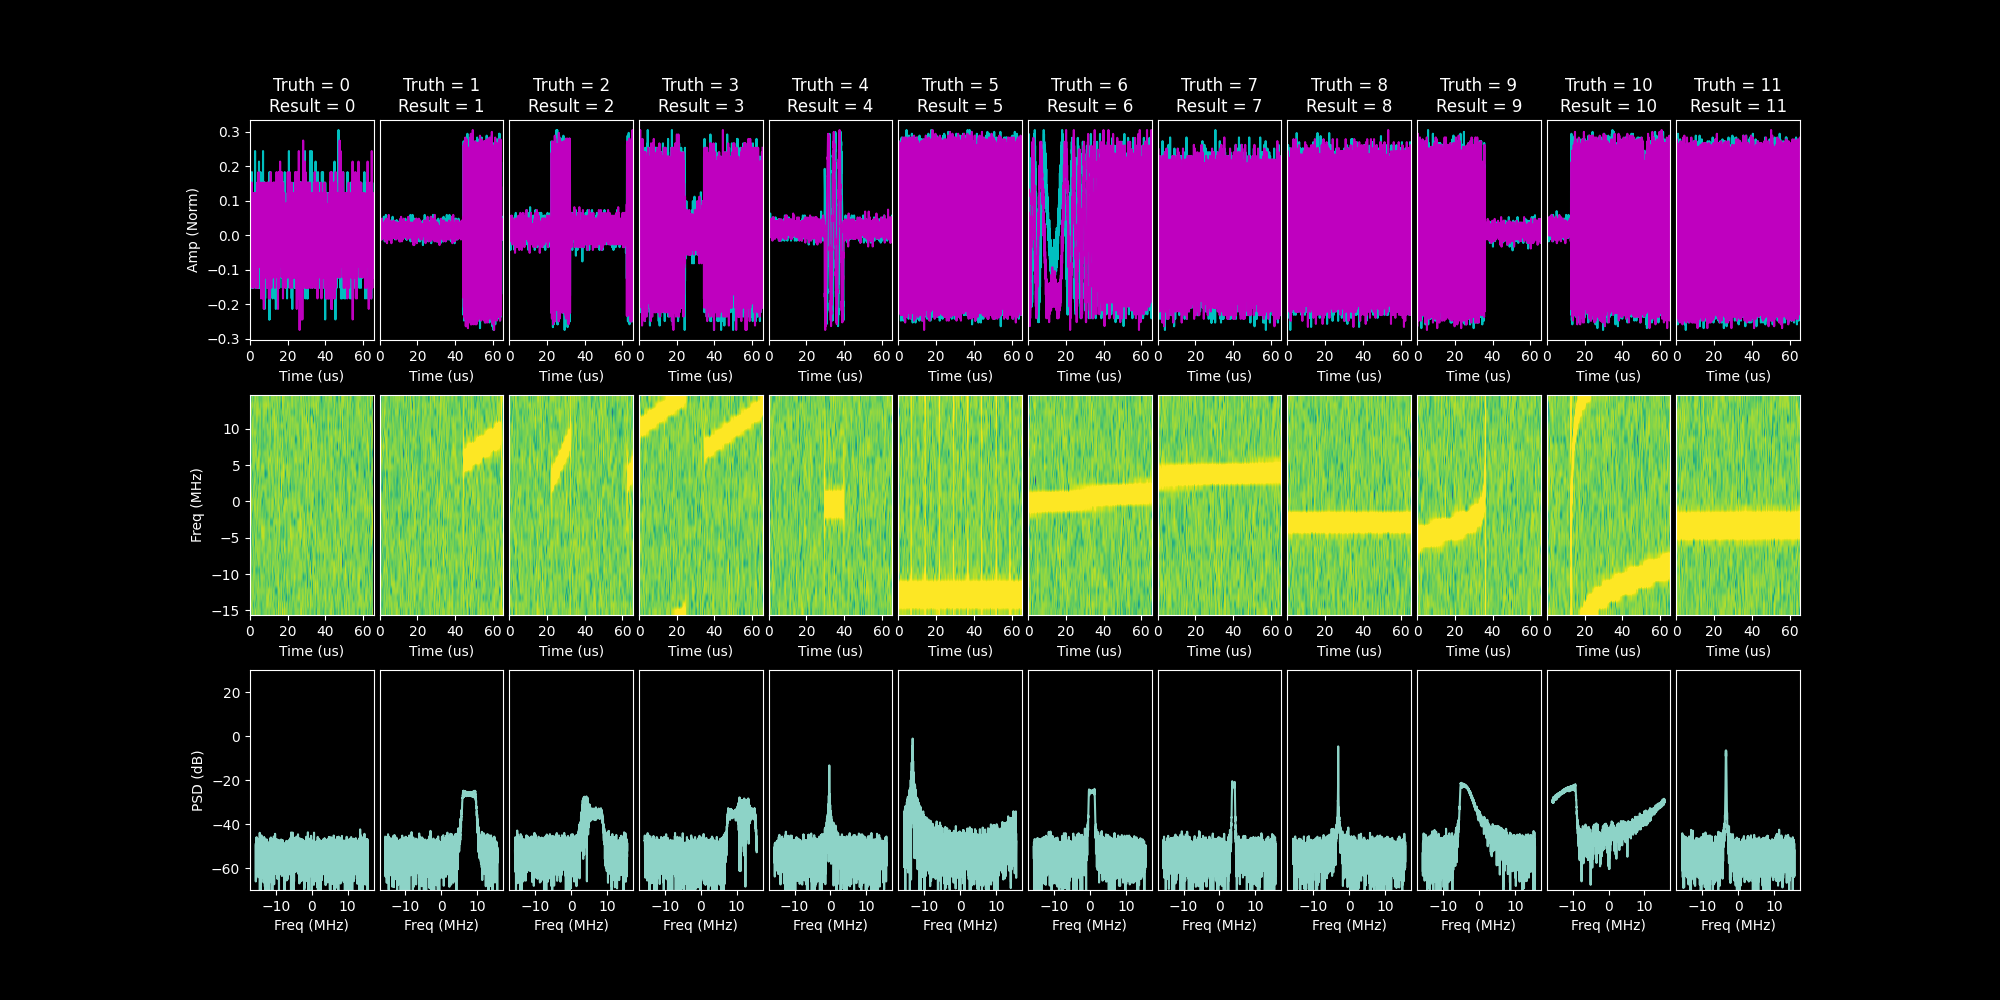
Running this script will produce an image in
/AirPack/output/saved_model_plot.pngdemonstrating the inference performance for each signal type.

TensorFlow 1 (Legacy)
Note: Deepwave strongly recommends transitioning to TensorFlow 2 as TensorFlow 1 is deprecated.
Train the Model on the Data
Run the training script
$ python /AirPack/airpack_scripts/tf1/run_training.py
The script will periodically display a terminal output similar to the following:
$ python /AirPack/airpack_scripts/tf1/run_training.py
...
(0 of 6094): Training Loss = 2.494922, Testing Accuracy = 0.109375
(100 of 6094): Training Loss = 1.590902, Testing Accuracy = 0.445312
(200 of 6094): Training Loss = 0.962753, Testing Accuracy = 0.664062
(300 of 6094): Training Loss = 0.617013, Testing Accuracy = 0.812500
(400 of 6094): Training Loss = 0.499497, Testing Accuracy = 0.773438
(500 of 6094): Training Loss = 0.317061, Testing Accuracy = 0.890625
(600 of 6094): Training Loss = 0.381197, Testing Accuracy = 0.867188
(700 of 6094): Training Loss = 0.347956, Testing Accuracy = 0.843750
(800 of 6094): Training Loss = 0.464664, Testing Accuracy = 0.796875
(900 of 6094): Training Loss = 0.384519, Testing Accuracy = 0.820312
...
...
(5800 of 6094): Training Loss = 0.025528, Testing Accuracy = 0.968750
(5900 of 6094): Training Loss = 0.068839, Testing Accuracy = 0.960938
(6000 of 6094): Training Loss = 0.017364, Testing Accuracy = 0.975000
(6100 of 6094): Training Loss = 0.046915, Testing Accuracy = 0.976562
Once the script has completed the training iterations, it will produce multiple files in the
/AirPack/data/outputdirectory including the following:checkpoint - file that defines the location of the saved model files
saved_model.meta - file that contains the graph and protocol buffer
saved_model.onnx - File that will be used for deployment on the AIR-T